


How to Make an Embroidery Pattern: A Practical Guide for US Shops and Designers
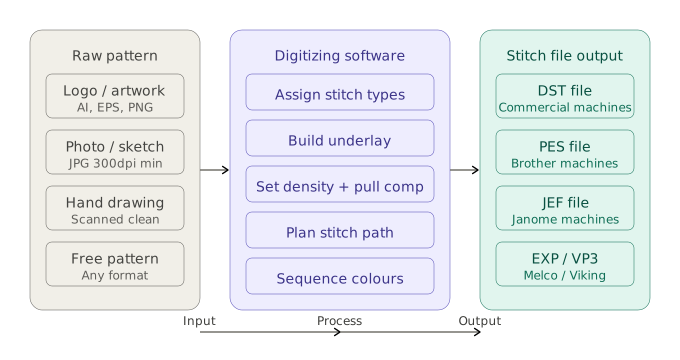
An embroidery pattern is not a picture. It is a set of precise, stitch-by-stitch instructions that tell an embroidery machine exactly where to go and what to do the direction of each thread, how dense the stitching should be, what order the colours appear in, and the path the needle takes across the fabric
The instructions are saved as a stitch file format like DST, PES or JEF . When you hand a design to a production machine, this file is what it reads. A JPEG or PNG means nothing to an embroidery machine. The stitch file is everything.
It is also worth separating two terms that often get mixed up. A pattern can be a hand-drawn template used for tracing in hand embroidery. A digitized file is the machine-ready version built inside embroidery software. This guide covers both because understanding the pattern level makes the digitizing step considerably easier.
From our shop floor: The most common misunderstanding we see from new clients is sending a PNG and expecting it to run directly on the machine. The digitizing step is always required there is no shortcut around it.
How to Make an Embroidery Pattern: 6 Steps
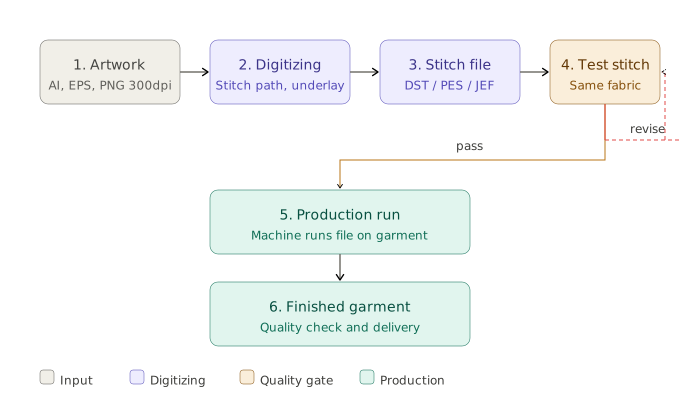
These six steps work for either in-house digitization or seeking professional support for digitizing. By repeating the procedure in the given order, you will be able to prevent reruns, wasted thread and displeased customers.
Step 1 Prepare Your Artwork
Use the cleanest of your files. Vector files are great AI, EPS, SVG they scale without losing fidelity and provide the digitizer with crisp sharp edges to digitize. If the image is only a raster image, make sure that it is at least 300 DPI on the actual embroidery size.
Before sending anything to software or a service:
- Reduce colours to a maximum of 6–8 solid thread colours. Embroidery machines cannot blend or gradient everything must be a solid stop.
- Outline all text in your design tool so font substitution cannot alter your logo.
- Remove detail under 1mm wide or text under 4mm tall these will not survive the digitizing process at production size.
Real example: A client recently sent us a coffee brand logo with a fine-line illustrated cup 11 colours, hairline borders, and 6-point serif text. We simplified it to 5 colours, replaced the hairlines with satin borders at 1.5mm, and increased the text height to 5mm. The finished cap embroidery looked sharper than the original logo because the simplification forced better design decisions.
Step 2 Choose Your Stitch Types
Every element in your design needs a stitch type assigned to it. Choosing wrong here is one of the main reasons designs look flat or fall apart at small sizes.
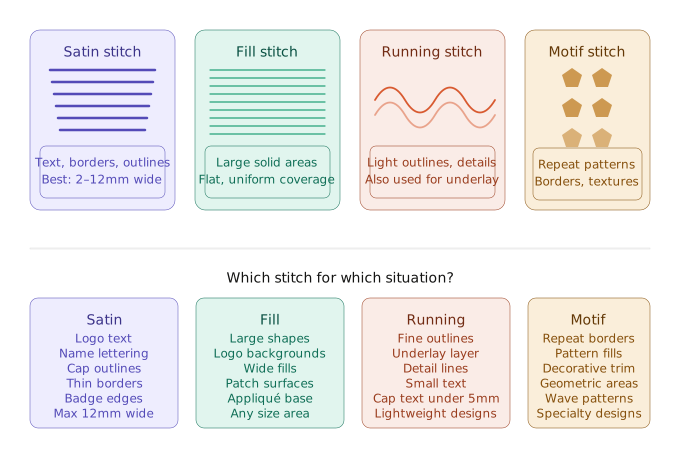
Production tip from our team: On caps, we almost always switch narrow satin columns to double-run outlines for text under 5mm. Satin at that scale catches on the cap profile during hooping and distorts. Double-run is cleaner and faster.
Step 3 Build Your Underlay
Underlay is the foundation layer of stitches that goes down before any visible work begins. It grips the fabric, stabilises it inside the hoop, and stops surface stitches from shifting as the machine runs.
Skipping underlay is the single most common reason beginner digitizing falls apart in production. Without it, even a well-built design drifts over hundreds of stitch cycles and loses alignment by the time the visible work is done.
For a full breakdown of underlay types by fabric, see our dedicated guide: How to Digitize an Image for Embroidery
Step 4 Set Density and Pull Compensation
Density controls how many stitches fill a given area. Pull compensation adjusts for the fact that fabrics stretch slightly under hoop tension without it, your columns end up narrower on the garment than they looked in the software.
General starting points for US production:
Fabric Type | Density (stitch spacing) | Pull Compensation |
Woven twill (caps, bags) | 0.40mm | 5–8% |
Structured polo | 0.42mm | 8–10% |
Stretch knit (sweatshirts) | 0.45–0.50mm | 10–15% |
Fleece | 0.50mm+ | 12–18% |
Mistake we see constantly: A shop sends us a file that ran fine on their twill caps and asks why it puckers on their new performance knit polos. The answer is almost always density and pull compensation. The same file does not work across both substrates without adjustment.
Step 5 Sequence Your Colours and Stitch Path
Stitch order determines whether your design reads cleanly or looks cluttered and overlapped. The standard rule is: outlines first, fills second, text last. This keeps lettering sitting on top of filled areas rather than being pressed beneath them.
Path planning minimises unnecessary thread trims and jump stitches. Every visible jump on the front of a garment is a path-planning problem; a skilled digitizer routes the needle to avoid them. Furthermore, fewer trims means faster run times and less chance of loose ends pulling through to the surface.
Step 6 Export in the Right Format and Test
Always export in the format your specific machine requires. Here is a quick reference for the most common formats used in the USA:
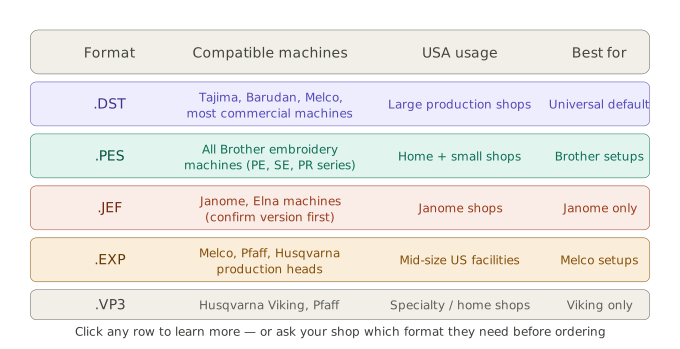
Before committing to any production run, test the file on the exact fabric and backing combination you will use. A test run takes 15 minutes. Fixing a problem discovered on piece 200 of 500 takes considerably long
How to Make an Embroidery Pattern for Different US Applications
The embroidery industry in the USA spans everything from one-person home studios to commercial shops running 50-head machines around the clock. The workflows, the machines, and the expectations differ significantly depending on the application.
Cap and Hat Embroidery in US Shops
Caps are the most produced embroidery item in the USA. The dominant machine brands in US commercial shops Brother, Tajima, Barudan, and Melco all handle cap embroidery but use different hoop systems and file formats. Brother shops need PES files. Tajima and Barudan typically run DST. Always confirm format before submitting a file for production.
For 3D puff cap embroidery, which is extremely popular in the US streetwear and promotional products market, your file needs to be purpose-built around foam insert depth. You cannot adapt a flat logo file for puff work without rebuilding the density layers.
Typical cap embroidery pricing in the US: $25–$50 per digitized file, with production costs ranging from $8–$15 per cap at commercial quantity.
Full guide: 3D Puff Cap Embroidery →
<!– INTERNAL LINK –>
Corporate and Uniform Embroidery
Left-chest logos on polos and jackets represent the largest volume category for most US embroidery businesses. These designs typically run between 3 and 4 inches wide and need to hold up across multiple fabric types woven twill, pique knit, and performance stretch because corporate clients order different garments from the same file.
The practical implication is that a single file often cannot serve all fabric types in a corporate order. The best US shops either build fabric-specific variants or set conservative pull compensation that works across most substrates without being optimal for any single one.
Custom Patches and Branded Merchandise
Custom embroidered patches follow different construction rules than garment logos. They typically sew on a stabilised backing, use a dense merrowed or satin border to define the edge, and require lockstitches at every jump point to keep the back clean for heat-seal or sew-on application.
Patches are also where appliqué embroidery becomes most useful. Large areas of solid colour can be replaced with a cut piece of fabric stitched into place, significantly reducing stitch count and production time on large-format designs.
Full guide: Appliqué Embroidery Designs →
<!– INTERNAL LINK –>
Free vs Custom Embroidery Patterns When Each Makes Sense
Free embroidery pattern files are a practical starting point for learning your machine, testing run settings, or filling in gaps in a personal project library. Thousands of free DST and PES files are available across US-based download libraries, and they work fine for practice and personal use.
For business use, however, free patterns are the wrong tool. They are generic, used by thousands of other shops, and they cannot represent a specific brand or logo. Moreover, free files are built for general use not for your specific fabric, hoop size, or machine type.
A professionally digitized custom file typically costs $15–$30 for a standard logo in the USA, with a 24-hour turnaround from most reputable services. On a run of 200 garments, that is less than $0.15 per piece easily the best investment in the production process.
Free embroidery patterns, formats, and download guide →
<!– INTERNAL LINK –>
What Makes an Embroidery Pattern Work in Real Production
Theory is one thing. Production is another. Here are the things that matter most when you move from building a file to actually running it.
Small text is the most common failure point. In our experience, text under 4mm tall on caps loses clarity consistently; the satin columns are too narrow to hold their shape during hooping. We recommend either increasing letter height to at least 5mm or switching to a double-run outline stitch for small text. This is a recommendation we give to almost every new client who brings cap work to us.
Fleece and terry fabrics need special handling. These pile fabrics are some of the most popular garment types in the US market hoodies, beanies, robes and they are also the most unforgiving substrates for digitizing errors. Fleece requires a particularly dense underlay (often a double-layer zigzag), a lower surface density, and longer tie-offs. Without this, the pile works into the stitching and produces a fuzzy, indistinct design.
Rush orders and file quality are directly related. The most expensive production mistakes we see in US shops happen when someone cuts corners on a rush order by skipping the test stitch. Fifteen minutes of testing saves hours of rework. No timeline pressure is worth finding a density problem on piece 150 of 300.
Machine brand matters more than people admit. A file digitized and tested on a Brother PE-800 will not necessarily run the same way on a Tajima TMEX. Different machines handle thread tension, presser foot pressure, and colour changes differently. If your shop runs a brand that is not commonly used by your digitizing service, tell them it affects how the file gets built.
Get Your Pattern Checked Before It Goes on 500 Shirts
Before you commit a file to a full production run, it is worth having an experienced eye look at it. A stitchability check takes a few minutes and can catch density problems, path issues, and format mismatches that are invisible in a software preview but obvious the moment the machine starts running.
Fineline Digitizing offers a free file review for any embroidery stitch file with no obligation. Send your DST, PES, or source artwork file and get back a plain-language assessment of whether it is production-ready, what needs adjusting, and why.
If you need a file built from scratch, our team turns around standard logo files in 24 hours with free revisions until it stitches correctly. Request a free review or get a quote →
FAQs
Everything you need to know about our digitizing & vector art services.
How long does it take to make an embroidery pattern?
A simple logo takes an experienced digitizer 20–45 minutes. It will take 2-4 hrs for a complex multi-color design, fine text, gradients or specialty stitching. Professional services in the USA usually deliver files within 24-hours and have rush services that can provide files same day or within 4-hours that will cost you extra
How do I make an embroidery pattern from a photo?
Photo-based digitizing for pet portraits, family images, and personalised designs requires a specialist approach that differs significantly from standard logo digitizing. The digitizer manually maps fur texture, facial structure, or scene elements into directional stitching. Auto-conversion tools do not produce usable results for photo work. For cross stitch pattern conversion from photos specifically, dedicated grid-based tools handle the process differently.
What is the best embroidery pattern format for Brother machines?
PES is the native format for Brother embroidery machines and is the most widely used format in US home and small-shop embroidery. Most professional digitizing services in the USA deliver PES as a standard output option alongside DST.
How do I know if my embroidery pattern is production-ready?
A production-ready file has been test-stitched on the same fabric and backing used in production, not just previewed in software. The test run should show clean edges, no puckering, no visible jumps on the front of the garment, and density that looks right for the substrate. If any of these are off, the file needs adjustment before it goes into production.
Free vs Custom Embroidery Patterns When Each Makes Sense
Free embroidery pattern files are a practical starting point for learning your machine, testing run settings, or filling in gaps in a personal project library. Thousands of free DST and PES files are available across US-based download libraries, and they work fine for practice and personal use.
For business use, however, free patterns are the wrong tool. They are generic, used by thousands of other shops, and they cannot represent a specific brand or logo. Moreover, free files are built for general use not for your specific fabric, hoop size, or machine type.
A professionally digitized custom file typically costs $15–$30 for a standard logo in the USA, with a 24-hour turnaround from most reputable services. On a run of 200 garments, that is less than $0.15 per piece easily the best investment in the production process.